This example shows some ways you can work with vector graphics in Apache Royale. Since Royale draws in part from the sources of Flash and Flex technologies, you'll find that the powerful Flash drawing API is supported for JavaScript and SWF applications. On the other hand, Apache Royale also supports use of SVG graphics.
In this example we create an Erlenmeyer flask, a measuring and mixing container for laboratories, that we can fill with some kind of strange green fluid. We can change the level of the fill with a Jewel HSlider, and use a ToggleButton to show or hide an indicator of the maximum level the liquid can reach. The bottle is be a static SVG shape and the fluid is drawn at runtime as the code responds when the slider value changes.
Example structure
We're using the Jewel UI set to build a simple interface as a placeholder for the example. We use a Jewel Card; the Jewel HorizontalCenteredLayout centers the card in the card on both axes.
As usual, the Card has three sections: a CardHeader (with the title), a CardPrimaryContent (that holds the bottle) and a CardActions (with some controls).
This is the main structure:
<j:Card width="460" height="680">
    <j:CardHeader>
        <html:H3 text="Working with vector graphics" className="primary-normal"/>
    </j:CardHeader>
    <j:CardPrimaryContent itemsHorizontalAlign="itemsCentered">

        <!-- Here will have the bottle -->

    </j:CardPrimaryContent>
    <j:CardActions itemsHorizontalAlign="itemsRight" itemsVerticalAlign="itemsCentered">
        <j:BarSection width="50%">

            <!-- Here will go the ToggleButton -->

        </j:BarSection>
        <j:BarSection width="50%" itemsHorizontalAlign="itemsRight">

            <!-- Here will go the Slider -->

        </j:BarSection>
    </j:CardActions>
</j:Card>
With this code in place we can…
Create the bottle
We use SVG graphics to assemble the flask, and ActionScript 3 code using the powerful Flash drawing API to create and manage the liquid. We're using both to show you both options so you have more weapons in your arsenal.
For the flask, I created three SVG files using a design tool. You can use whatever tool you prefer to draw vector art and export it in SVG format. I used Affinity Designer software to create it since I think it's one of the best professional and modern tools available today. But many other free, open source and commercial options are available, so choose whatever you want.
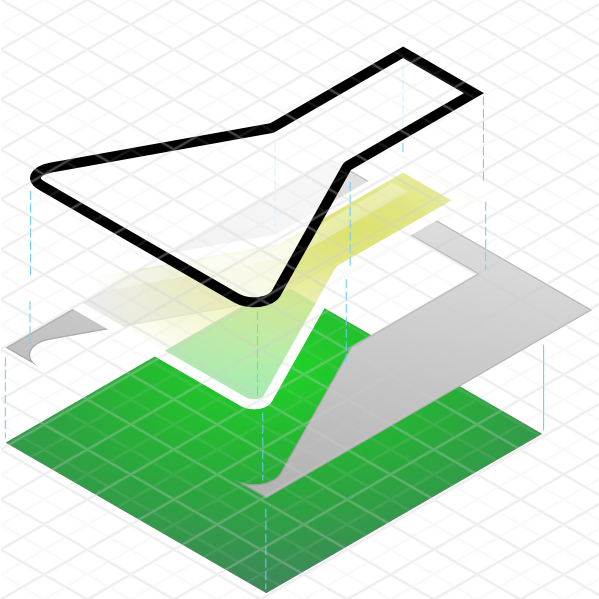
The flask's three files are: A mask, a shade (with some reflections and gradients) and the main flask shape. I loaded the files with the svg:Image Royale component. Then I added a red indicator line coded In SVG directly in Royale to show that option with svg:Rect. Finally the fluid uses the UIGraphicsBase class that lets you work with the Flash drawing API.
I added all the parts to a Jewel Container so I can position them in relation to each other as layers. The Container clips the content so things that fall outside the container boundaries are hidden.
You can see all the pieces in perspective in the following image:
Here is the final code of the Container that composes all the graphic parts:
<j:Container localId="fgShape" width="400" height="500">

    <!-- liquid -->
    <js:UIGraphicsBase localId="bgShape" width="400" height="500"/>

    <!-- rule -->
    <j:Group>
        <svg:Rect localId="rule" x="180" y="{bgShape.height - rule.height}" width="6" height="350">
            <svg:fill>
                <js:SolidColor color="#ff0000" alpha=".5"/>
            </svg:fill>
        </svg:Rect>
    </j:Group>
    <!-- fill mask -->
    <svg:Image src="assets/bottle-mask.svg" width="400" height="500"/>
    <!-- inner shade -->
    <svg:Image src="assets/bottle-shade.svg" width="400" height="500"/>
    <!-- main shape -->
    <svg:Image src="assets/bottle-main.svg" width="400" height="500"/>

</j:Container>
Notice that the fluid is declared first so the other shapes can hide the fluid that is outside the flask shape.
Fluid controls
To provide some interactivity we add a ToogleButton and an HSlider. The button lets you show and hide the indicator line; move the slider to change the fluid level from empty to full.
The ToogleButton has the following code:
<j:ToggleButton localId="ruleVisibility"
    outlined="true" emphasis="emphasized"
    text="Hide Rule" selectedText="Show Rule" selected="true">
    <j:icon>
        <js:ToggleFontIcon text="{MaterialIconType.VISIBILITY_OFF}" selectedText="{MaterialIconType.VISIBILITY}" material="true"/>
    </j:icon>
</j:ToggleButton>
It uses an outlined style with emphasized coloring, and material icons and texts for both selected and unselected states.
Show and Hide the indicator with binding
We control the visibility of the red indicator line with the data binding Royale feature:
First add ApplicationDataBinding to the application beads to make Royale support binding at that level (Remember that Royale is PAYG, so we only add code when it is really necessary instead of adding lots of code that you probably will never use to every component).
Then add the binding to the Group that holds the rule.
<!-- rule -->
<j:Group visible="{ruleVisibility.selected}">
When you run the application, click the button to show and hide the red indicator.
Add the slider
We finish the action controls part by adding a label and a slider in the last BarSection of the CardActions. The slider lets you change the fluid level.
<j:Label text="Slide to fill"/>
<j:HSlider localId="slider" value="0" minimum="0" maximum="500"/>
Drawing the fluid
Using the drawing API in Royale is easy, and well-supported by both JavaScript and SWF. We get the Graphics instance of the UIGraphicsBase object in the following way:
var g:Graphics = Graphics.getInstanceFor(bgShape);
Now we can use the graphics object to invoke drawing functions like moveTo, lineTo, and more.
To draw the fluid we use the following function using fills, lines and quadratic bezier curves:
/**
 * Draw the liquid to fill the bottle
 */
private function drawLiquid(g:Graphics, color:Number, alpha:Number, x:int, y:int, width:int, height:int, wave:int):void {
    if(y > height)
        y = height;
    g.beginFill(color, alpha);
    g.moveTo(x, height);
    g.lineTo(x, y);
    g.curveTo(width / 4, y - wave, width / 2, y);
    g.lineTo(width / 2, y)
    g.curveTo(width * 3 / 4, y + wave, width, y);
    g.lineTo(width, height);
    g.lineTo(x, height);
    g.endFill();
}
Then to join all the pieces we add a valueChange event handler to the HSlider:
<j:HSlider localId="slider" value="0" minimum="0" maximum="500" valueChange="changeFill(event)"/>
The changeFill function is the following:
/**
 * Fill the bottle
 */
private function changeFill(event:ValueChangeEvent):void {
    var g:Graphics = Graphics.getInstanceFor(bgShape);
    var newHeight:Number = transformValueFromRange(slider.value, slider.minimum, slider.maximum, 0, rule.height);
    var newY:Number = fgShape.height - newHeight;

    g.clear();
    drawLiquid(g, liquidColor, .5, 0, newY, 400, 500, -15);
    drawLiquid(g, liquidColor, 1,  0, newY, 400, 500, 30);
}
When we change the HSlider position, the code calls the function, gets the graphic object, calculates the new height value based on the current container height (transforming ranges), clears all drawings and redraws two different liquids with some displacement on X and change on the wave length with the new values.
And that's all! I hope you like this drawing feature in Royale. You'll be able to do many creative things in your Royale applications with it!
As always, enjoy!
Where to go from here
- Apache Royale Data Binding documentation page
- Apache Royale Jewel UI Set documentation page
- Jewel HSlider Royale Docs page
- Jewel Card Royale Docs page
The result of this code snippet is the following:
(We're using an iframe to host the actual results of this example compilation. To see the example in a separate window click this link.)
Full project with source code can be found here: