Apache Royale v0.9.4 released!
The Apache Royale community is pleased to announce the release of Apache Royale 0.9.4.
The Apache Royale project is a continuation of the previous effort called FlexJS to produce a next-generation of the Apache Flex SDK that enables developers to use MXML and ActionScript to generate HTML/JS/CSS applications which can run natively in browsers. The cross-compiled code can also be used in Apache Cordova (Adobe PhoneGap) mobile applications.
This release should be considered 'beta' quality. The purpose of this release is to gather feedback about the features and implementation strategies, and to recruit new contributors. We hope to grow the code base into an SDK and tool chain that deliver the highest productivity when developing applications that can run on many platforms. Beta releases may not handle production needs.
In 0.9.4 you can find important additions like a full new UI set called Jewel that's ready for production. This new set was designed with look and feel / themes in mind, so you can have a cool interface out of the box just using Jewel. Another great addition is bringing full AMF/RemoteObject support to Apache Royale so you can ease your migration from Apache Flex.
We are also working hard on MX and Spark emulation components that will help make your migration of an existing Apache Flex application a breeze. Many people are contributing to this effort, but more are welcome: please help us develop this powerful feature.
Changes in 0.9.4:
- Better way to style components: ClassSelectorList
- Fixed AMF / RemoteObject support
- Added New Jewel UI set And first 72 Jewel Themes, 12 Colors, Light and Dark (Initial work).
- Renamed TextOverflow bead to EllipsisOverflow. It now supports Label elements as well.
- Added IEEventAdapterBead.
- Added Object getter/setter utility functions.
- Added InfiniteVScroller Bead.
- Initial release of the migration component sets (MXRoyale and SparkRoyale) that have a goal of reducing the effort for those moving existing Flex applications to Royale.
- Initial release of the Tour de Flex example migrated to Royale via the migration component sets. This is a work in progress. You can see the latest version running on our CI server.
Known Issues:
- Users only using Basic components and not MXRoyale or SparkRoyale emulation components should delete frameworks/libs/MXRoyale.swc, frameworks/libs/SparkRoyale.swc, frameworks/js/libs/MXRoyaleJS.swc, and frameworks/js/libs/SparkRoyaleJS.swc from their library paths (or from the file system).
Updates to the RELEASE_NOTES discovered after this file was packaged into the release artifacts can be found here:
https://github.com/apache/royale-asjs/wiki/Release-Notes-0.9.4
You can see more here.
You can download a binary distribution, the source code or browse our GitHub repositories. If you're a NPM user you can check Apache Royale at NPM.
As well, you can help us filing bugs in the framework or compiler.
For questions about how to use Royale, send email to mailto:users@royale.apache.org. For questions and feedback on the development of the source code in the release, send email to dev@royale.apache.org.
Enjoy! 🙂
Hello Node: How to transpile ActionScript 3 for Node.js
Note: This tutorial was originally published in Josh Tynjala's NextGen ActionScript website, but is now donated to Apache Royale. The tutorial has been adapted to correct the things that changed in Apache Royale since it was published.
Over the years, many developers have dreamed of using ActionScript on both the client and the server. Today, the Apache Royale™ SDK finally makes it possible.

Let's learn to use asnodec to write ActionScript code that runs in the popular server-side JavaScript environment, Node.js.

With asnodec, we'll get full access to all Node.js APIs, and it's even possible to require npm modules in ActionScript. We'll start with a simple example.
Requirements
For this tutorial, you should install Node.js. The newest Long Term Support (LTS) release is recommended.
Additionally, you will need Apache Royale 0.9.4 or newer. Use the downloads page, or download it from Node Package Manager with
npm install -g @apache-royale/royale-jsCreate a new project
- Create a new, empty folder for your project, and name it HelloNode.
- Inside the new project, create a new folder named src. This is where our ActionScript classes will go.
- Inside the src folder, create a file named HelloNode.as, and add the following code:
package
{
    public class HelloNode
    {
        public function HelloNode()
        {
            console.log("Hello", process.release.name, process.version);
            dns.lookup("localhost", null, dnsLookupCallback);
        }

        private function dnsLookupCallback(error:Object, address:String):void
        {
            console.log("The address of localhost is:", address);
        }
    }
}
In this class, we're doing two things. First, we're printing the version of Node to the console. Then, we're using Node's built-in dns module to look up an IP address.
It is not necessary to call
require()for built-in Node modules in ActionScript. The compiler will detect when a module is used, and it will generate the appropriate call torequire()automatically when generating the final JavaScript. (require()is necessary for custom modules)
Compile the project on the command line
Inside the Apache Royale SDK, the js/bin folder contains several different exeuctables used to transpile ActionScript to JavaScript.
What do each of those executables in js/bin do?
- asjsc compiles pure ActionScript to JavaScript with access to web browser APIs like the HTML DOM.
- asnodec compiles pure ActionScript to JavaScript with access to Node.js APIs to create server-side or command line projects. We'll use this one.
- mxmlc compiles applications that use the Apache Royale framework components.
Use the asnodec executable to transpile the HelloNode ActionScript class that you created above for Node.js.
asnodec src/HelloNode.asThis will produce a folder named bin containing js-debug and js-release folders. The js-debug folder contains JavaScript that is easy to read, and each class is loaded at runtime from a separate file. The js-release folder contains JavaScript that has been concatenated and minified for production.
The project should now contain the following files and folders:
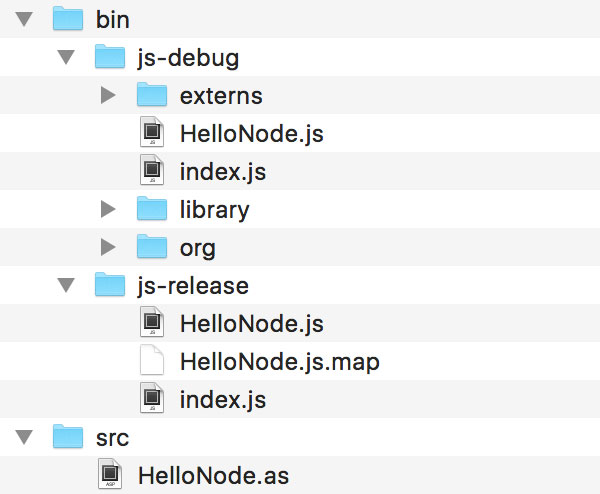
Finally, let's try running our code with Node.js.
Run the project
Inside the js-debug folder, a file named index.js will be created as the entry point for your Node.js project. You can run this script using the node executable:
node bin/js-debug/index.jsYou should see the following output in your console:
Hello node v6.11.0
The address of localhost is: 127.0.0.1
(The Node version number might be different, obviously!)
What's Next?
This is just a simple example, but it gives you a glimpse of how developers can bring ActionScript server-side using Apache Royale and Node.js. By using an established ecosystem like Node.js, ActionScript developers can take advantage of all of the libraries published to NPM and join a large, vibrant community.
Loading external data through HTTPService
This example shows you how to use HTTPService to access external data to use in your Apache Royale application.
You can use HTTPService to retrieve data in XML, JSON, or other formats. We'll use GitHub API services to get JSON formatted GitHub data so we can load info about the code of this example, which is hosted in GitHub.
It uses the new Jewel UI set that supports themes and is available in the 0.9.4 release or later.
<?xml version="1.0" encoding="UTF-8"?>
<j:Application xmlns:fx="http://ns.adobe.com/mxml/2009"
              xmlns:j="library://ns.apache.org/royale/jewel"
              xmlns:js="library://ns.apache.org/royale/basic"
              xmlns:html="library://ns.apache.org/royale/html"
              xmlns:services="services.*">

    <fx:Script>
        <![CDATA[
           import org.apache.royale.events.Event;
           import org.apache.royale.events.MouseEvent;
           import org.apache.royale.jewel.Alert;

           public function getGithubContent(event:MouseEvent):void
           {
               service.getContent();
           }

           public function dataReadyHandler(event:Event):void
            {
               Alert.show(service.jsonToString, "JSON data retrieved");
               jsonData.html = "Some JSON Data: <br><strong> - service.json.name:</strong> " + service.json.name +
                                "<br><strong> - service.json.sha:</strong> " + service.json.sha +
                                "<br><strong> - service.json._links.html</strong> " + service.json._links.html;
                sourceCodeMXMLText.text =  service.sourceCode;
            }
        ]]>
    </fx:Script>

    <fx:Declarations>
        <services:GitHubService id="service"
           sourceCodeUrl="https://api.github.com/repos/apache/royale-asjs/contents/examples/blog/BE0011_Loading_external_data_through_HTTPService/src/main/royale/BE0011_Loading_external_data_through_HTTPService.mxml"
           dataReady="dataReadyHandler(event)"/>
    </fx:Declarations>

    <j:initialView>
        <j:View>
            <j:beads>
                <j:HorizontalCenteredLayout/>
            </j:beads>

            <j:Card percentWidth="90">
                <html:H3 text="Loading Github external data through HTTPService"/>

                <j:Label text="This example loads its source code in the text code panel:"/>

                 <html:Pre height="300" percentWidth="100" style="background-color: white">
                    <html:beads>
                        <j:ScrollingViewport/>
                    </html:beads>
                    <html:Code id="sourceCodeMXMLText"/>
                </html:Pre>

                <j:Label id="jsonData" multiline="true" html="This label shows JSON data when loaded."/>

                <j:Button text="Retrieve source code from Github" emphasis="primary" click="getGithubContent(event)"/>
             </j:Card>
        </j:View>
    </j:initialView>
</j:Application>
We create an Apache Royale interface that shows a text code panel to load the source code of this example in it. GitHub doesn't let us load a page from its domain in an iFrame, so this is the only way to embed GitHub content in your application.
The text code panel is made of pre and code html tags with some custom style to make the background white. We provide a Label to show accessing Json data directly with dot notation. Finally we provide a button to trigger the HTTPService.
Tip: We use the ScrollingViewport bead to add scrolling behavior to our text code panel.
The most important piece in this example is the custom GitHubService class that wraps the HTTPService object. We declare it in MXML in our application to pass the Github URL to request and declare an event handler to show the data once it is loaded.
This is the GitHubService class:
package services
{
    import org.apache.royale.events.Event;
    import org.apache.royale.events.EventDispatcher;
    import org.apache.royale.net.HTTPConstants;
    import org.apache.royale.net.HTTPService;
    import org.apache.royale.utils.string.Base64;

    [Event(name="dataReady", type="org.apache.royale.events.Event")]
    /**
     * GitHubService is in charge of getting the source code of some example
     * so we can show the code in a TabBarContentPanel along with the working example
     */
    public class GitHubService extends EventDispatcher
    {
        /**
         * constructor
         */
        public function GitHubService():void
        {
            service = new HTTPService();
            service.addEventListener(HTTPConstants.COMPLETE, completeHandler);
        }

        /**
         * the service that performs the request to Github
         */
        private var service:HTTPService;

        /**
         * we dispatch an event once we have the source code from github
         */
        private function completeHandler(event:Event):void
        {
            dispatchEvent(new Event("dataReady"));
        }

        private var _sourceCodeUrl:String = null;
        /**
         * The source code url we want to retrieve
         */
        public function get sourceCodeUrl():String
        {
            return _sourceCodeUrl;
        }
        public function set sourceCodeUrl(value:String):void
        {
            _sourceCodeUrl = value;
            service.url = sourceCodeUrl;
        }

        /**
         * json returns the retrieved GitHub JSON Object
         */
        public function get json():Object
        {
            return service.json;
        }

        /**
         * jsonToString returns the retrieved GitHub JSON Object as String
         */
        public function get jsonToString():String
        {
            return service.data;
        }

        /**
         * decode and return the base 64 content (real source code)
         */
        public function get sourceCode():String
        {
            return Base64.decode(service.json.content);
        }

        /**
         * trigger the HTTPService to retrieve the GitHub data
         */
        public function getContent():void
        {
            service.send();
        }
    }
}
We instantiate the HTTPService in the constructor, and declare an event listener for the HTTPConstants.COMPLETE event, so we perform actions when the data finishes loading. The action we do from this class is throw a new event "dataReady" to consume in our application.
sourceCodeUrl will pass the GitHub url to be called by our service class, and fills HTTPService.url so HTTPService knows what url to target.
As we get the data loaded, we can manage it with HTTPService.data, and we have a convenient HTTPService.json getter to access the JSON Object that HTTPService already parses for us. We exposed this data in our json class as jsonToString and json getters respectively.
Finally, the source code is in the json.content variable, but comes encoded in base64, so we can use Apache Royale's decode function in the Base64 class to get the decoded xml string to use in our example App. We exposed this in a convenient getter function in our service called sourceCode.
Where to go from here
- Apache Royale documentation page about loading external data
- Jewel Label Royale Docs page
- Jewel Button Royale Docs page
- Jewel Card Royale Docs page
The result of this code snippet is the following:
(We're using an iframe to host the actual results of this example compilation. To see the example in a separate window click this link.)
Full project with source code can be found here: